ADAPTED FROM ERIN JEANNE MCDOWELL
by Deb Bernadini, owner of Forno 413We've only just met, but at the risk of revealing too much, too soon, I'm going say something controversial: I strongly oppose store-bought pie crust. I know, I know, we're all busy. Shortcuts are ok. Even Ina does it! But hear me out. Assuming you have flour and butter, and you have available counter space for rolling dough, making your own pie crust is way easier than going to the store to buy one, and infinitely more delicious, especially when using fresh-milled flours.
Here follows a mini pie-crust tutorial and recipes for two delicious pot pies that will provide major comfort as the late winter snow-ice-rain-slush season drags on.
INGREDIENTS
- 300 g Ground Up Grain All-Purpose Flour*
- ½ tsp salt 226 grams
- (1 cup; 2 sticks) cold unsalted butter, cubed into ½” dice ½ cup + ¼ cup ice water
- 1 egg for egg wash**
*Or my favorite flour blend: 150g Ground Up AP, 100g Ground Up Pastry, 50g Ground Up Ancient Grains Flour
** To make egg wash, whisk together 1 large egg, 1 TBSP water and a pinch of salt.
INSTRUCTIONS
1. Combine the flour and salt in a bowl and mix to combine (use a fork and quickly toss).
2. Add in the cubed butter. I like to toss the butter and flour together with my hands first until all the butter pieces are coated with flour, then I quickly flatten the butter pieces with my thumb and index finger. Once all the pieces have been flattened (just one flattening per piece, you don't want to overdo it and warm the butter up), switch to a pastry cutter and continue to combine the butter and flour. I’m right-handed, so I hold the pastry cutter in my right hand and, with a rocking motion, work the flour and butter together. I use my left hand to rotate the bowl as I go.
3. Add 1/2 cup ice water to the bowl, using your hands to mix and fold the mixture over itself until a shaggy dough forms. It will likely be quite dry – remember that we are working with fresh flour, which contains more germ and bran than commercially milled AP flour. That means you will need more water than most standard recipes call for. Assuming your dough is still sandy and dry, add the remaining ¼ cup of ice water. (If your dough is NOT sandy but is holding together, you do not need to add the extra water). Keep bringing the flour together, but don’t work it too much here. It will still be shaggy and crumbly.
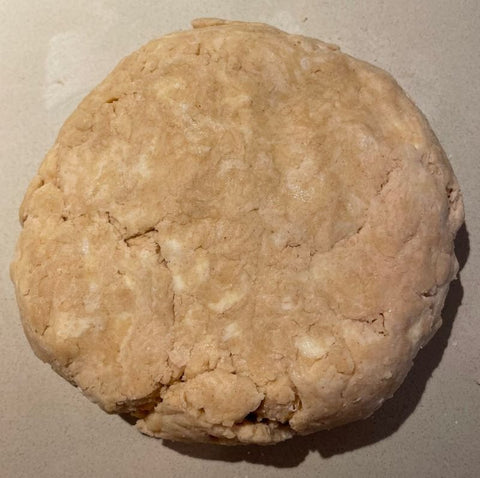
4. Dump the contents of the bowl onto a clean work surface (like your countertop). Use your hands to bring it all together into a cohesive mass, pushing the pieces together and gently kneading. The dough should all hold together, but don’t overwork it – it’s fine to see some “marbling” of the butter pieces – these are the makings of a nice, flaky crust when baked!
5. Once it’s all holding together, divide it into 2 equal pieces and shape it into two discs, each about an inch thick. Wrap each disc in plastic wrap and chill for at least 30 minutes.
6. After 30 minutes, remove one piece of dough discs from the refrigerator and place it on a lightly floured surface. Using your rolling pin, gently but firmly tap down on the dough to make the cold butter pliable. Begin rolling the dough from the center out (I like to picture the sun and its rays). Don’t roll all the way to the edges, or your edges will be too thin and will stick to the counter. Roll into a 12” circle – continuing to work from the center out. Work quickly, continuing to rotate and moving the dough as you go to prevent it from sticking to your work surface. You can slide a bench scraper under the outer edges if it’s sticking.
7. Once you’re reached the desired size, roll the dough up onto your rolling pin to lift it from the counter and then gently unroll it into your pie pan. Once the dough is centered, press it gently into the pan - you should have approx. 1” overhang all the way around – don’t trim it. Use a fork to prick holes all over the dough that lines the bottom of the pan. (This is called docking). These holes will allow steam to escape and prevent your dough from puffing up and pulling away from the bottom of the pan as it bakes. Gently place the plastic wrap over the dough-lined pan and return to the refrigerator.
8. Remove the second disc and roll it into a 12” circle, using the same method as above. Transfer it to a plate or baking sheet, drape it with plastic, and return it to the refrigerator.
Notes:
- When making pie crusts, cold butter is the key, key, key to a flaky crust. If it’s warm in your kitchen, you can put all your tools – the bowl, the pastry cutter, even the mixed flour, and salt – in the refrigerator to chill before you start.
- Some people have hot hands – or sometimes, it’s just hot – so use your hands sparingly.
- If the butter starts to feel warm and soft during the mixing process, stop and put it in the refrigerator to firm up and chill for a bit before continuing.
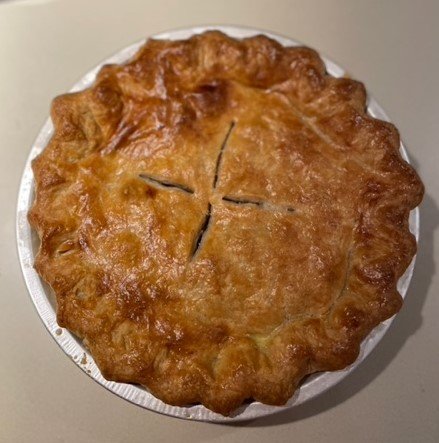
- This recipe makes two generous 9" pie crusts (for a top and a bottom).
- It can be made in advance and stored in the fridge for three days or wrapped tightly in plastic and frozen for 3 months.
- It's a great all-around pie crust recipe, suitable for sweet pies like apple as well as savory ones.